
For all of you who are starting off with a new DSLR, here is a series of posts designed to help you get your feet wet. This will be an evolving category of posts, so if you have any questions or ideas, please let me know.
Monday, November 30, 2009
Friday, November 27, 2009
The Golden Hour
Photographers call the hour after sunset and the hour before sunset "the golden hour." Seems like it should be "the golden hours" doesn't it? Well, let me save you the embarrassment of calling it the wrong thing - it's "the golden hour." Anyway, together, these two hours are called the golden hour because of the warm orange glow pictures have when taken during these time periods. It's not the only time you can take pictures outside, but many people (especially landscape photographers) would argue that it is the best.
Not only do the colors look great, but having the sun low in the sky provides good options for lighting. If the sun is to the left or right of your subject you can get some pleasing shadows that give your image depth and dimension. If the sun is behind your subject, you can get some neat back-lit effects - glowing hair included. Having the sun shining directly on the front of your subject is rarely desirable. Consider the following examples:


Not only do the colors look great, but having the sun low in the sky provides good options for lighting. If the sun is to the left or right of your subject you can get some pleasing shadows that give your image depth and dimension. If the sun is behind your subject, you can get some neat back-lit effects - glowing hair included. Having the sun shining directly on the front of your subject is rarely desirable. Consider the following examples:


Black Friday
Amazon has the Nikon D40
Monday, November 23, 2009
White Balance and Mood
If you don't know what white balance is, read here.
White balance is typically used to make the colors in your pictures look accurate. The goal is to make white things look white and all the other colors look like they do in real life. However, white balance can also be used to change the mood of your pictures. Changing the white balance can make pictures seem warmer or cooler (some may say harsher.)
Most of your camera's white balance settings change how blue or orange your image appears. (The fluorescent setting does not fit in this category since fluorescent lights are greener than other light sources.) Because of this, intentionally using a WB setting that is not the most accurate can make your picture seem warmer or cooler than it actually was in real life. Consider the following pictures:
This shot was taken on a gloomy, overcast day. And it looks like it because the WB was set for cloudy.

This shot was taken a moment later with the WB set to shade.

Notice how much warmer this image looks. It may not be reality, but it's a nicer picture to look at. Try experimenting with your WB settings so you know what they do to your pictures. Then when you want to make a slight color adjustment to you pictures, you can use your WB to do it.
Sunday, November 22, 2009
Picture of the Week

Thursday, November 19, 2009
Cut Out Distractions
There are lots of things we can do with our cameras to make our pictures look better, but sometimes there are simple things we can do that have nothing to do with our camera settings. Many times simplifying the scene we are photographing can make our images look better. Simplifying helps to focus a viewer's attention on our subject. Often, what seems to stand out when we are looking at real life in three dimensions can blend in when we see it in a two dimensional picture; so it's good to reduce the number of competing or distracting elements that we include in our frame.
There are two primary ways to cut out distractions. First, we can change our angle in order to change what is behind our subject. Second, (sometimes) we can just move something out of the way - or wait for something (people) to move out of the way. In either case, the goal is to make the background more plain and uniform so that our subject doesn't have any competition for attention.
In the picture below I noticed the colorful toys were distracting from my subject.

So I moved them.

There are two primary ways to cut out distractions. First, we can change our angle in order to change what is behind our subject. Second, (sometimes) we can just move something out of the way - or wait for something (people) to move out of the way. In either case, the goal is to make the background more plain and uniform so that our subject doesn't have any competition for attention.
In the picture below I noticed the colorful toys were distracting from my subject.


If you have the means, you can remove distractions after the fact on your computer. This is the same image as the one above with a little Photoshop magic:

Tuesday, November 17, 2009
Fall Afternoon
Here's something a little different you can do with pictures.
We took over 3000 pictures for this video and used about 2000 of them.
We took over 3000 pictures for this video and used about 2000 of them.
Saturday, November 14, 2009
Picture of the Week

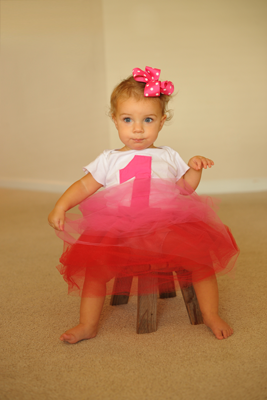
- Shutter Speed: 1/100
- Aperture: f5.6
- ISO: 200
- White Balance: Sunny
- Focal Length: 55mm
- Exposure Comp: 0
PS I just found out that this site doesn't display correctly if you are using Internet Explorer. I'm not an html expert, so I don't think I can fix it. But if you are still using Internet Explorer, it can only be because you have not heard of Firefox - so check it out.
Friday, November 13, 2009
Recommended Canon Products
It's pretty obvious that I'm a Nikon guy, but I know some of you out there are partial to Canon. Since I have owned and used Canon equipment, I can say honestly that both companies make great stuff. I prefer Nikon because I think the cameras are easier to operate and the exposure is consistently better when using a flash (however, I am occasionally jealous of some of Canon's lens options.)
Having said all that, I'd like to share with you what I think would make up the ideal "Mom Kit" if you are already invested in Canon. Most of these items are direct equivalents of what I recommend from Nikon. You can read the reasoning behind my choices on that page.

Moms (as well as most photographers) love those smooth out of focus backgrounds and the ability to take pictures inside without a flash. These are both benefits of having a lens with a large maximum aperture. For Nikon-moms, the choice is easy. It seems like Nikon has designed a lens with you in mind: Nikon 35mm f/1.8 . For Canon users, the choice is between two main candidates, in my opinion, and they both come with trade-offs.
So if you are a Canon owner looking at these two lenses, here's my advice: spend a day with your zoom lens set to 50mm and decide whether you can live with that focal length in the situations you would want to use a wide-aperture lens. If it seems good, go with option #2, but if you consistently feel like you need to zoom out, save up some Christmas money and hold out for option #1.
Having said all that, I'd like to share with you what I think would make up the ideal "Mom Kit" if you are already invested in Canon. Most of these items are direct equivalents of what I recommend from Nikon. You can read the reasoning behind my choices on that page.

I'd start off with the Canon Rebel XS (pictured above) which comes with the 18-55 mm IS lens. I'd add the EF-S 55-250mm f/4.0-5.6 IS
 for a telephoto zoom and the Speedlite 270EX
 for a flash. From here it gets a little trickier for Canon users than Nikon users.
Moms (as well as most photographers) love those smooth out of focus backgrounds and the ability to take pictures inside without a flash. These are both benefits of having a lens with a large maximum aperture. For Nikon-moms, the choice is easy. It seems like Nikon has designed a lens with you in mind: Nikon 35mm f/1.8
- Option #1 is the 35mm f/2
which is very similar to the Nikon option, but costs $120 more (at $320.) This lens is sure to be great and well built, but may be out of the budget.
- Option #2 is the 50mm f/1.8 II
which is aimed at consumers (not professionals) costing only $98. This a great deal - cheaper than anything a Nikon D40 owner can get - but the problem is the focal length. With this lens, you might find that you can't ever get far enough away from the action to get the shot you want.
So if you are a Canon owner looking at these two lenses, here's my advice: spend a day with your zoom lens set to 50mm and decide whether you can live with that focal length in the situations you would want to use a wide-aperture lens. If it seems good, go with option #2, but if you consistently feel like you need to zoom out, save up some Christmas money and hold out for option #1.
Wednesday, November 11, 2009
What's Wrong With This Picture? (2)
A few weeks ago we were at the beach, where we took a bunch of pictures (of course.) Here are a few that didn't turn out so well.
This one has a couple of problems. First, and most obvious, it is focused on the water instead of the subject. This is a no-no. You can read about how to focus your camera here. Second the frame cuts off part of the subject - her toes. There's no rule that says you can't ever cut off part of your subject (in fact I talk about it being good here,) but in this case, it hurts the image because it seems accidental and brakes the frame awkwardly.


This last shot doesn't have any of those problems and is a much more successful photograph.

Tuesday, November 10, 2009
Composition: Lines

This same principle can be applied when we are photographing children (or anything else.) Consider how lines lead your eyes and focus your attention in these images:


Friday, November 6, 2009
Fill Flash
Earlier this week Julia, a reader, asked:
"Is there ever a time when you would want to have the flash not bounce?"
This is a great question - especially considering my enthusiasm for bouncing the light from a flash off the ceiling. There are definitely circumstances in which using direct flash is appropriate. Here are some examples:
1. When you don't have a flash that can bounce. This may seem obvious, but I don't just mean if you don't own a flash with the capability to aim up. There are times our daughters are doing something super cute when the time to capture it is limited. In these circumstances there may be time to simply grab a camera, pop up the flash and fire, but not enough time to get another flash before the moment is over. That's what happened here, one of the first times our daughter was laughing at us . . .

Additionally, there are times we are out and about with only our point and shoot camera in a pocket. If we need a flash, there's only one option. And it can do a decent job . . .

I mention these circumstances first not because this is a life altering insight, but because I don't want any of you to get so serious about great exposure that you miss out on capturing great moments. So don't forget that using the flash on your camera might enable you to get a picture you couldn't get without it.
2. I doubt the above advice is exactly what Julia was looking for, so here's an answer for when direct flash is actually better than bouncing the flash. It's what people commonly refer to as "fill-flash." The idea is that light from a flash coming at your subject from a horizontal angle can "fill in" shadows created by light coming from above or behind your subject. In these cases you use your flash to even out the lighting in the scene. I talked about this some in a post on controlling the power of your flash. Here are some examples from that post . . .
This shot is taken without using a flash and the background is too bright for the subject.

And here is the same shot using a direct flash.

This technique is also very useful when light from above (often the sun) is casting dark shadows on your subjects eyes.
3. Another time direct flash is preferable is when the ceiling (or whatever you would bounce the light off) is not white (or at least close to white.) This will cause your image to have a color cast.
Tuesday, November 3, 2009
Bounce Flash Examples
Here are some examples of what I talked about yesterday:


Direct Flash

Bounce Flash

Direct Flash

Bounce Flash

Monday, November 2, 2009
Subscribe to:
Posts (Atom)


