Monday, June 29, 2009

Composition: Off-Center

We often get in a rut when it comes to photographic composition. It's good to experiment with different techniques and styles. One thing to try is putting your subject off-center. Instead of lining your subject up with the box in the middle of your view finder, put it off to one side. (There's a composition rule called "the rule of thirds" that makes this same point.)
Having your subject in the center of your frame is by no means bad. However, in some circumstances, your image can be much more interesting and compelling if the subject is not centered. Consider these images.

Saturday, June 27, 2009

Picture of the Week

Here's my favorite picture from this week. We went to a local peach farm where the aroma was wonderful.
Here are the crucial settings for this picture:
  • Shutter Speed: 1/60
  • Aperture: f5.6
  • ISO: 400
  • White Balance: Cloudy
  • Focal Length: 55mm

          Friday, June 26, 2009

          Using Slow Shutter Speed Creatively


          When you slow down your shutter speed, your sensor records what you aim your camera at for a longer period of time. This means that if something is moving, the movement will be recorded. The effect that we see is called motion blur or implied motion.
          In the picture of the waterfall above, my shutter speed was 1/3 of a second. Over the course of that 1/3 second, the water was moving and the rocks were not. Therefore we see the implied motion of the water in the blurry streaks, but the rocks are crisp and clear.
          In the picture below, I set my shutter speed to 1/60 of a second to capture the motion and excitement of Belle as she emerged from her hiding place behind the curtain. Notice again, the things which are not moving are sharp, while the things that are moving appear blurry.
          This technique can be used in numerous ways. Try slowing your shutter speed down while you are photographing moving things and see what you get. As you experiment with this, you might discover your a need for a tripod. I'll discuss this soon.

          Thursday, June 25, 2009

          How to Control Shutter Speed

          Shutter speed is one of two factors that determine how much light your camera's sensor is exposed to when you take a picture (exposure.) Consequently, shutter speed is one of the most important things to understand if you want to venture out of "green box" mode.
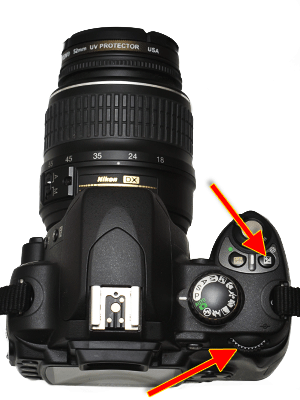
          Controlling your shutter speed gives you more control over exposure and more control over creativity. The simplest way to begin experimenting with shutter speed is to put your camera in "shutter-priority" mode. To accomplish this, rotate your camera's control dial (indicated below) to "S" if you have a nikon camera like the D40 or "Tv" if you have a canon camera.


          In shutter priority mode, winding the command dial (indicated below) will change your shutter speed and your camera will do the rest of the work to produce a correct exposure. As you peer through your viewfinder, you will see a number changing as you wind. That number indicates your shutter speed (it's not the number with the "f" in front of it, but the other one.) The number indicates the reciprocal of your shutter speed in terms of seconds. In other words, if you see a 60, then your shutter speed is 1/60th of a second.


          There's lots more to say about shutter speed, but that's enough for one day. Try experimenting with it and see what happens. More on this tomorrow.

          Wednesday, June 24, 2009

          What is Shutter Speed?

          Here's a video explaining what shutter speed is:


          Monday, June 22, 2009

          Practical Tip: Rapid Fire

          Lots of times moms see something cute happening so they snap a picture or two and stop, believing they have captured the moment. While one picture may serve to remind you of a cute memory, it may not sufficiently capture or display the cuteness. It's better to have lots of pictures to chose from even if you have to delete some later on.
          When there is something worth photographing, take a lot of pictures of that one thing in a row. You've already got your camera out and you aren't paying per picture if you are shooting digital, so take advantage of the opportunity. (This is one great reason to own and use a DSLR.)
          Consider the collection from which last week's picture of the week was selected. All of these pictures were taken in 48 seconds.

          Saturday, June 20, 2009

          Picture of the Week

          For inspiration, here's my favorite picture from this week. I captured this shot at Greenville's Saturday Market. Belle is enjoying a "Smore on a Stick," from Chocolate Artworks.

          If your curious, here are the crucial settings for this picture:
          • Shutter Speed: 1/250
          • Aperture: f8.0
          • ISO: 200
          • White Balance: Sunlight
          • Focal Length: 52mm

          Thursday, June 18, 2009

          Composition: Fill the Frame - Caveat

          I talked last time about filling the frame and cutting elements out of your image that don't contribute to its success. This typically means zooming in or walking closer, but don't take this too far and think that every picture should be a close-up. Sometimes it is better to fill the frame by zooming out.
          Remember to pay attention to what you can see through the view finder (and not just what you are looking at.) Consider whether your picture would benefit from adding more of the scene.

          Sometimes it is beneficial to add elements to your image that provide context or a more interesting composition. With kids, this often means showing enough of what is happening around them so that someone who wasn't there can tell what was going on. Many times making your child small in the frame can be compelling if the rest of the image is interesting and well composed.

          Consider this shot of our daughter at the aquarium in Atlanta:


          Tuesday, June 16, 2009

          Composition: Fill the Frame

          When composing a shot through the view finder of your camera, it is important to consider how much of a scene you are including in your shot. Often times pictures can be improved by simply zooming (or walking) closer to your subject. By doing this, we can literally fill up our frame with what we are trying to capture in an image. Many times inexperienced photographers include unneeded elements that end up being distractions.
          As you frame your shot try to "fill the frame" with your subject. If your child is the subject, let him stretch from edge to edge or top to bottom. After all, he is the most important part of the picture.
          Too many times we concentrate on what we are looking at and not what we can see. While your eye is on your view finder, ask yourself what you can see that doesn't add to the appeal of the scene, and then cut it out by zooming closer.
          In this image, notice how much "extra junk" there is. Do we need to see that much stroller? What about that bench in the background? It doesn't add anything helpful to the picture by giving us context or an interesting visual element. We don't really want to look at any of that stuff, so why include it in the frame?
          This is better. Now we see that beautiful girl first and our eyes don't bounce around to anything else.

          Sunday, June 14, 2009

          Exposure Compensation

          Yesterday we talked about how to recognize when your camera has not properly exposed an image. So today let's talk about what to do when you notice something wrong.

          There are lots of things that affect exposure, but for now we are going to talk about the simplest way to adjust your exposure and still let your camera do almost all of the work. It's called "Exposure Compensation" and it's really easy to use.
          How to Control it
          To adjust the exposure, hold down the exposure compensation button (which is indicated with a +/- symbol), and wind the primary adjustment wheel. I've indicated these two controls on the Nikon D40 below. As you do this you will notice in the viewfinder and the LCD monitor on the back (in the case of the D40) that a number is being changed. It will change from 0 to things like +.3 , +.7 , +1 . . . or -.3 , .-7 , -1 . . .
          When to use it
          If your picture is too dark, adjust the exposure compensation to a positive number to add to the exposure. If your picture is too bright, adjust the exposure compensation to a negative number to subtract from the exposure. In both cases start with .3 , check the results and make a stronger adjustment if needed. You will learn as you use this control when to adjust it more drastically the first time.
          Warning
          Your camera will keep your adjustment until you change it back. If you are taking a bunch of pictures under the same lighting conditions this is a good thing. Once you have this set all your pictures will be taken with this adjustment. Just remember to set it back to zero when you are done or when the lighting conditions change.

          Saturday, June 13, 2009

          What is Exposure?

          When we talk about exposure, we are talking about how much light reaches the sensor in your camera (or how much light the sensor is "exposed" to.) Too much light is bad (over-exposed); too little light is bad (under-exposed.) When it comes to exposure your camera does all the work if you let it. Usually it will do a great job, but it is important to recognize when you need to give it a little help. Check out these examples so you can learn how to look for visual cues which indicate incorrect exposure.
          All three of these pictures were taken in less than ideal conditions--in other words, normal conditions for moms. The scene is lit by a florescent light from one side, an incandescent light from another, and a flash on the camera.
          Under-exposed
          This first image is not terribly dark (most people will notice that without instruction) but it could be better. When evaluating exposure, look at the whites in your image. Here, the white shirt is dull and grey. Notice also that the colors are muted compared to the properly exposed image.
          Over-exposed
          This image, too, is not terrible, but notice why it isn't quite right. The patches of white on the sleeve have lost detail. Looking closely at these patches, you wouldn't be able to see any texture on the shirt. Another place to look is the brightest part of the face--in this case the nose. Notice the unnatural color making the nose look almost neon.
          Correct Exposure
          Tomorrow we'll talk about how to adjust your exposure when you notice it's wrong.

          Thursday, June 11, 2009

          What camera should I buy?


          I'll cut to the chase. If you're a mom and need a camera buy a Nikon D40.  You can get it Amazon,  or B&H.  This is why:
          1. Digital is the way to go. It's easy, fast, and fun.
          2. You need an SLR if you want great pictures of your kids. If you have a point and shoot camera, you are going to capture the moment after the moment you wanted. An SLR will give you better quality and a LOT MORE flexibility.
          3. Go with a good name. I like Nikon. Canon is also great and would be my second choice. If you want a Canon, check out the Rebel XS or Rebel XSi.
          4. Don't pay for more than you need. The low-end DSLRs from Nikon and Canon are PERFECT for moms. Don't let a smooth talking salesmen convince you otherwise. Six megapixels is plenty.
          5. I've seen the Nikon D40 with a lens available for about $350 multiple times over the last few months. It was a great deal when I bought it for my wife at $550 two years ago.
          I've owned Nikon and Canon cameras. I think Nikons are easier to use, but if you have a Canon, don't feel bad - they are great. I use two very expensive Nikon cameras for my professional work that can do a lot more than moms need, but if we are going to the park, we take my wife's D40. I've recommended this camera to dozens of moms and they all love it.

          Wednesday, June 10, 2009

          Practical Tips

          Here is an evolving list of posts with practical tips:

          Composition Tips

          Here is an evolving list of posts about Composition:

          About Photomom101

          What is Photomom101?
          Photomom101 is a site designed to provide useful, practical lessons for moms who want to be better photographers. Unlike most photography websites that are loaded with technical jargon and unrealistic suggestions, Photomom101 is written specifically with moms in mind. Posts are written by a professional photographer and edited by a mom (his wife) to ensure that they are simple to understand and easy to apply.

          Who is Photomom101 for?
          Photomom101 has something for anyone who wants to learn about photography. The composition lessons and practical tips can be applied by any photographer with any camera. The pictures of the week serve as examples for inspiration and instruction.
          The posts in our DSLR User's Guide and buying advice are written for moms with digital SLRs. Some of the instruction in these posts can be applied to point and shoot cameras, but generally they are for those who want to go beyond the limits of a point and shoot.
          How to use Photomom101?
          • For moms with an SLR: If this is your first time visiting Photomom101, check out our DSLR User's Guide. This post will walk you through the basics of how to control your camera. Additionally you can work your way through our composition lessons and practical tips to improve your technique. Of course, continue to check the site for newer posts as well.
          • For moms with a point and shoot: If this is your first time visiting Photomom101, check out 10 Rules for Point and Shoot Cameras. From there, you can work your way through our composition lessons and practical tips to improve your technique. Of course, continue to check the site for newer posts as well.