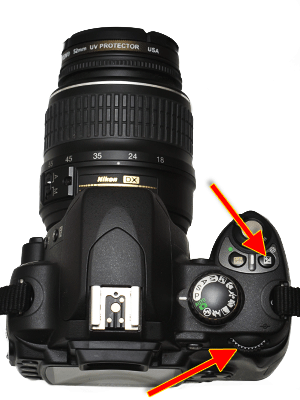
There are lots of things that affect exposure, but for now we are going to talk about the simplest way to adjust your exposure and still let your camera do almost all of the work. It's called "Exposure Compensation" and it's really easy to use.
How to Control it
To adjust the exposure, hold down the exposure compensation button (which is indicated with a +/- symbol), and wind the primary adjustment wheel. I've indicated these two controls on the Nikon D40 below. As you do this you will notice in the viewfinder and the LCD monitor on the back (in the case of the D40) that a number is being changed. It will change from 0 to things like +.3 , +.7 , +1 . . . or -.3 , .-7 , -1 . . .
When to use it
If your picture is too dark, adjust the exposure compensation to a positive number to add to the exposure. If your picture is too bright, adjust the exposure compensation to a negative number to subtract from the exposure. In both cases start with .3 , check the results and make a stronger adjustment if needed. You will learn as you use this control when to adjust it more drastically the first time.
Warning
Your camera will keep your adjustment until you change it back. If you are taking a bunch of pictures under the same lighting conditions this is a good thing. Once you have this set all your pictures will be taken with this adjustment. Just remember to set it back to zero when you are done or when the lighting conditions change.


